Set Up the Virtual Machine
The MRS SDK Qt project provides a pre-built Ubuntu 24.04 LTS Desktop virtual machine image with Qt Creator and pre-configured build kits. This guide walks you through obtaining, importing, and using the VM.
Quick Start
Section titled “Quick Start”- Install virtualization software for your host OS
- Obtain the VMDK image (download or build locally)
- Import it into your virtualization platform
- Launch the VM and start developing with Qt Creator
Image Contents
Section titled “Image Contents”The VM includes:
- Ubuntu 24.04 LTS Desktop (minimal)
- Qt Creator IDE
- Build tools (gcc, g++, make, cmake, ninja, git)
- MRS Qt SDK pre-cloned at
~/repos/mrs-sdk-qt/ - Automatic provisioning script:
- Installs Qt 5.15.0 LTS and Qt 6.8.0 LTS development kits with all modules
Install Virtualization Software
Section titled “Install Virtualization Software”Here are our recommended platforms depending on your host operating system:
| Host OS | Virtualization |
|---|---|
| Windows | VirtualBox, VMWare |
| Linux | virt-manager |
- Download the VirtualBox platform: https://www.virtualbox.org/wiki/Downloads
- Installation instructions: https://www.virtualbox.org/manual/topics/installation.html
You will have to create a free Broadcom account before you can download VMware.
- Create Broadcom account: https://profile.broadcom.com/web/registration
- Download VMware Workstation Pro: https://support.broadcom.com/group/ecx/free-downloads
NOTE: virt-manager is only available for Linux users.
You can install it via your native package manager: https://virt-manager.org/
NOTE: GNOME Boxes is only available for Linux users.
Installation directions are here: https://snapcraft.io/gnome-boxes
Obtain the VM Image
Section titled “Obtain the VM Image”Option 1: Download Pre-built Image
Section titled “Option 1: Download Pre-built Image”Pre-built VM images are available for download:
- Visit the MRS SDK Qt VM Images OneDrive folder
- Download the latest
mrs-sdk-qt.vmdkfile - Follow the import instructions below
Option 2: Build Locally
Section titled “Option 2: Build Locally”To build the VM image on your machine:
Prerequisites:
- Docker with Docker Compose
- KVM access (optional but recommended for faster builds) /_ The VM disk by default is 60GB. The 80GB number has a safe buffer. _/
- 80GB free disk space
- 6+ GB available RAM
Build steps:
cd vm && ./build-vm.shjust vm/buildThe VMDK file will be created in the vm/output/ directory.
More information is available in the VM builder reference.
Import the VM
Section titled “Import the VM”Import the VMDK file using your virtualization platform (VirtualBox, VMware, etc.):
- Open your virtualization software
- Import the
mrs-sdk-qt.vmdkfile - Configure settings (recommended: 6GB RAM, 2 CPUs, 60GB disk)
- Start the VM
First Boot
Section titled “First Boot”-
Log in with the default user credentials
- Username:
ubuntu - Password:
ubuntu
- Username:
-
Security recommendation: change the password on first login:
Terminal window passwd -
Run the provisioning script to install all necessary Qt toolchains:
Terminal window ~/provision.sh
Using the VM
Section titled “Using the VM”The MRS SDK Qt repository is pre-cloned at ~/repos/mrs-sdk-qt/. You can start developing immediately without needing to clone it.
Starting Qt Creator
Section titled “Starting Qt Creator”Select Qt Creator from the application menu or open a terminal and run:
qtcreator &Creating a New Project
Section titled “Creating a New Project”- Launch Qt Creator
- File > New Project > Select your desired project type
- Qt Creator will display available build kits
- Choose your target kit and proceed
Included Build Kits
Section titled “Included Build Kits”- Desktop Qt 5
- Desktop Qt 6
System Tools
Section titled “System Tools”The VM includes common development tools:
- GCC compiler and build-essential toolkit
- CMake and Ninja build systems
- Git version control
- SSH client/server
- Curl and wget
Customization
Section titled “Customization”Increasing VM Resources
Section titled “Increasing VM Resources”If you need more processing power:
- Stop the VM
- In your virtualization platform’s settings:
- Increase allocated RAM
- Increase CPU cores
- Increase disk size (may require filesystem expansion)
- Restart the VM
Installing Additional Software
Section titled “Installing Additional Software”Use the standard Ubuntu package manager:
sudo apt-get updatesudo apt-get install <package-name>Snapshots and Backups
Section titled “Snapshots and Backups”Create VM snapshots before making significant changes using your virtualization platform’s snapshot feature.
Troubleshooting
Section titled “Troubleshooting”Qt Creator Won’t Start
Section titled “Qt Creator Won’t Start”-
Verify installation:
Terminal window which qtcreator -
Try launching with verbose output:
Terminal window qtcreator -d -
Check system logs:
Terminal window journalctl -e
Slow Performance
Section titled “Slow Performance”- Ensure VM has adequate RAM allocated (6GB recommended)
- Check host system resource availability
- Disable 3D acceleration if causing issues
Network Issues
Section titled “Network Issues”- Verify networking is enabled in VM settings
- Check network adapter status:
ip link show - Test connectivity:
ping google.com
Low Disk Space
Section titled “Low Disk Space”Check available space:
df -hIf running low, you can clean up apt cache:
sudo apt-get cleansudo apt-get autocleanKnown Issues
Section titled “Known Issues”GNOME Boxes
RTC Configuration
Section titled “RTC Configuration”Boxes is optimized for Windows VMs, which expect the RTC (Real Time Clock) from the host to use the local time, not the UTC time. However, Ubuntu/Linux VMs typically need the RTC to be in UTC time. This is not configurable from the VM; it is determined by the hypervisor software before the VM even boots.
The MRS SDK VM is configured to sync its hardware clock with the host’s UTC clock. So, with the default configuration, the VM will have an incorrect system time, which can cause issues with:
- Package manager operations (
apt) - SSL/TLS certificate validation
- Build timestamps and caching
To enable proper RTC in Boxes, you must edit the VM’s libvirt configuration:
-
Right-click the VM in GNOME Boxes > Preferences > Resources tab
-
Click Edit Configuration (bottom of the dialog)
-
Locate the
<clock>tag and modify it to look like this:<clock offset="utc">...</clock> -
Click Save to apply the changes.
-
Restart the VM. After reboot, the system time will automatically sync with your host system’s UTC clock.
Operating System Auto-Detection
Section titled “Operating System Auto-Detection”When you go through the process of creating a new VM in GNOME Boxes, you will be presented with a screen like this:
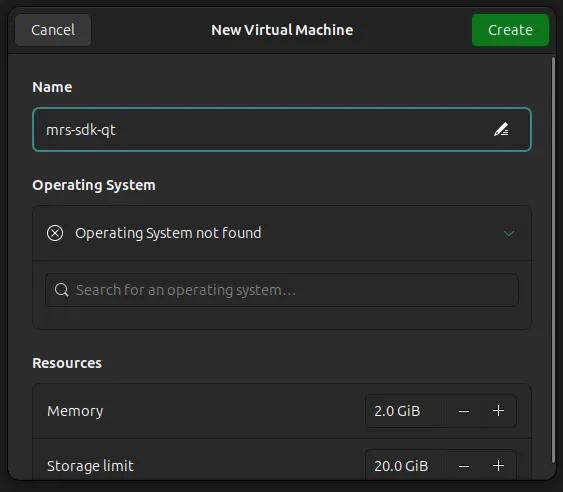
The Operating System selector is intended to streamline the process of configuring a new VM. However, the Ubuntu configurations in Boxes have been found to apply certain settings that will break network connectivity in the MRS SDK VM.
So, DO NOT select an operating system or allow auto-detection; leave the input as “not found”.
”Failed to Start” Error
Section titled “”Failed to Start” Error”Gnome Boxes will often show an error “Failed to start…”, but this can be safely ignored. Wait a few minutes and the VM will start without issues.
Getting Help
Section titled “Getting Help”- Documentation: https://qt.mrs-electronics.dev
- Issues: GitHub Issues
- Discussions: GitHub Discussions
- Contact: info@mrs-electronics.com